Various Reviews, Page 8
By Ed Ting
Updated 8/1/04
1) Howie Glatter Skypointer
2) TeleVue Paracorr
3) Universal Astronomics Unistar Alt-Az Mount
4) Chromacor
5) Filter Slide by Astrocrumb
6) Focus Knobs
1) Howie Glatter's Skypointer 9/18/01, 1/11/02
($235 + $5 shipping)
Don't you wish you had a dime for every time a member of the general public asked
you if your Telrad shot a beam of red light into the sky? Everyone is always
disappointed when you tell them how it really works. Wouldn't it be great if you
had a device that actually shot a beam of light into the sky? Nah....that's not
possible, is it? Is it?!??
Well, from the ever innovative and energetic Howie Glatter comes this Skypointer.
The bad news is, it costs $235. The good news is, once you see one work, you are
going to HAVE to get one (er, maybe we should file that one under "bad news" too.)
So if you want to save yourself two bills, take my advice and stay away from anyone
who has one of these.
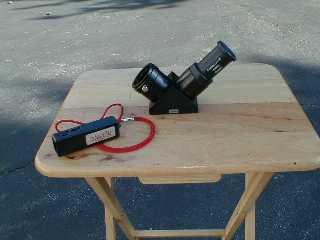
 It actually shoots a beam of light
into the sky...
Using one of the new 532 nM green lasers, which generate up to ten times the output
(5 mW) of conventional red laser pointers, this penlight-sized device shoots a bright
green pencil-thin beam several hundred feet into the sky when you turn it on. It is
so bright that other telescopes looking at where you're pointing will show a light
green tint in their views. Please be kind and turn yours off when you have acquired
your object. Also, it goes without saying that you should never look into the beam,
or shine it at somebody.
You can mount this to your scope, as pictured, or you can simply hand-hold it to
point out objects in the sky. This is a great, great tool for teaching the sky
to beginners. It removes all doubt when pointing out stuff with your finger or
with magnifying finders, which can be confusing to newcomers. I once helped
someone find NGC7006 (the distant globular in Delphinus) for the first time
within 1 minute, and I was standing almost twenty feet away from his telescope.
It actually shoots a beam of light
into the sky...
Using one of the new 532 nM green lasers, which generate up to ten times the output
(5 mW) of conventional red laser pointers, this penlight-sized device shoots a bright
green pencil-thin beam several hundred feet into the sky when you turn it on. It is
so bright that other telescopes looking at where you're pointing will show a light
green tint in their views. Please be kind and turn yours off when you have acquired
your object. Also, it goes without saying that you should never look into the beam,
or shine it at somebody.
You can mount this to your scope, as pictured, or you can simply hand-hold it to
point out objects in the sky. This is a great, great tool for teaching the sky
to beginners. It removes all doubt when pointing out stuff with your finger or
with magnifying finders, which can be confusing to newcomers. I once helped
someone find NGC7006 (the distant globular in Delphinus) for the first time
within 1 minute, and I was standing almost twenty feet away from his telescope.
 It comes with a nice carrying case...And it
shoots a beam of light into the sky!
The beam operates at 1000 hz, with a duty cycle of 75%. Thus, when you slew it
across the sky quickly, the beam may break up momentarily into little dots. The
75% cycle is used to save on battery life, which is short (the device draws a
hefty 250 mA when in use.) Have several sets of AAAs handy, or bite the bullet
and get yourself some NiMH rechargables. It comes with a nice metal case and
a pair of batteries to get you started. The device is reverse-polarity protected.
There does seem to be some variation in the brightness of the beam, both between
samples, and within the same unit under different conditions. The beam seems to
be somewhat weaker when it's cold out. Howie Glatter and I spent some time
during a cold evening swapping batteries, warming samples with our hands, etc,
and couldn't reach any definite conclusions. This doesn't seem to seriously affect
the usefulness of the device, but it's worth mentioning. In any case, Glatter said
he'd look into it.
OK, so it costs $235. But I am telling you, you are going to be a happier
astronomer when you get it. And if it makes you feel any better, the first
generation of these green lasers cost well over $1000, and didn't have a beam
anywhere near this tight. I know of someone who is thinking about buying
two - one for his scope, and one to hand-hold. When your wife asks you what
you bought today, you can just show it to her. A laser pointer - she'll figure it
cost you about twenty bucks.
This is a great tool, a wonderful supplement to your conventional finders, and
an all around cool-man-cool gadget. At my keynote speech at the Black Forest
Star Party this year (2001) I selected this as my "Favorite Accessory."
Update, 1/11/02: Well, it seems as though some of you have very strong opinions
on this device! Various people have expressed concerns about light pollution,
safety, and battery life. With regards to light pollution, I've found that the
device is easily visible up to about fifteen feet away, then its visibility drops
off rapidly. It goes without saying that as a courtesy you should turn off the
pointer when not in use. Even if you don't turn it off yourself, the large power
drain will soon do it for you.
With regards to safety, Glatter has started putting warning labels on the devices.
Again, it goes without saying that you should never point the device at another
person, or a pet. You should also be careful around reflective objects.
Also, I've noticed that in very cold weather (below 20 degrees F or so) that the output
of the device drops off rapidly to the point where you can't see the beam anymore.
I once thought my sample was broken during a very cold night, but as soon as we
got back in the warm car, I could shoot a green beam into the sky even through
the windshield. This is a consideration if you live in cold climates. Howie says
that if you use the device for a couple of minutes continuously, it warms due to its
own usage and often the beam gets stronger.
Finally, Glatter is developing a tethered switch that allows you to turn the device
on from a short distance. This is an advantage for users of large scopes. My
earlier statement about the development of an external battery was incorrect;
there are no such plans for such a device as of this writing.
2) TeleVue Paracorr 3/16/02
(Coma-correcting interface lens, $300-$350 street depending on version)
As Newtonians get bigger and faster, many of them start having coma issues at the
edges of the field of view. Enter the Paracorr, a most useful device from TeleVue.
This new version has a tunable top, which adjusts to the kind of eyepieces you own.
It is much better than the older version of the Paracorr, and if you have a fast
Newtonian, you should consider upgrading to this new unit.
It comes with a nice carrying case...And it
shoots a beam of light into the sky!
The beam operates at 1000 hz, with a duty cycle of 75%. Thus, when you slew it
across the sky quickly, the beam may break up momentarily into little dots. The
75% cycle is used to save on battery life, which is short (the device draws a
hefty 250 mA when in use.) Have several sets of AAAs handy, or bite the bullet
and get yourself some NiMH rechargables. It comes with a nice metal case and
a pair of batteries to get you started. The device is reverse-polarity protected.
There does seem to be some variation in the brightness of the beam, both between
samples, and within the same unit under different conditions. The beam seems to
be somewhat weaker when it's cold out. Howie Glatter and I spent some time
during a cold evening swapping batteries, warming samples with our hands, etc,
and couldn't reach any definite conclusions. This doesn't seem to seriously affect
the usefulness of the device, but it's worth mentioning. In any case, Glatter said
he'd look into it.
OK, so it costs $235. But I am telling you, you are going to be a happier
astronomer when you get it. And if it makes you feel any better, the first
generation of these green lasers cost well over $1000, and didn't have a beam
anywhere near this tight. I know of someone who is thinking about buying
two - one for his scope, and one to hand-hold. When your wife asks you what
you bought today, you can just show it to her. A laser pointer - she'll figure it
cost you about twenty bucks.
This is a great tool, a wonderful supplement to your conventional finders, and
an all around cool-man-cool gadget. At my keynote speech at the Black Forest
Star Party this year (2001) I selected this as my "Favorite Accessory."
Update, 1/11/02: Well, it seems as though some of you have very strong opinions
on this device! Various people have expressed concerns about light pollution,
safety, and battery life. With regards to light pollution, I've found that the
device is easily visible up to about fifteen feet away, then its visibility drops
off rapidly. It goes without saying that as a courtesy you should turn off the
pointer when not in use. Even if you don't turn it off yourself, the large power
drain will soon do it for you.
With regards to safety, Glatter has started putting warning labels on the devices.
Again, it goes without saying that you should never point the device at another
person, or a pet. You should also be careful around reflective objects.
Also, I've noticed that in very cold weather (below 20 degrees F or so) that the output
of the device drops off rapidly to the point where you can't see the beam anymore.
I once thought my sample was broken during a very cold night, but as soon as we
got back in the warm car, I could shoot a green beam into the sky even through
the windshield. This is a consideration if you live in cold climates. Howie says
that if you use the device for a couple of minutes continuously, it warms due to its
own usage and often the beam gets stronger.
Finally, Glatter is developing a tethered switch that allows you to turn the device
on from a short distance. This is an advantage for users of large scopes. My
earlier statement about the development of an external battery was incorrect;
there are no such plans for such a device as of this writing.
2) TeleVue Paracorr 3/16/02
(Coma-correcting interface lens, $300-$350 street depending on version)
As Newtonians get bigger and faster, many of them start having coma issues at the
edges of the field of view. Enter the Paracorr, a most useful device from TeleVue.
This new version has a tunable top, which adjusts to the kind of eyepieces you own.
It is much better than the older version of the Paracorr, and if you have a fast
Newtonian, you should consider upgrading to this new unit.
 Paracorr (center) with 27 mm Panoptic
The Paracorr does act like a +15% barlow, so figure this into your calculations.
Put another way, your f/4.5 optical train becomes a more reasonable f/5, and your
f/5 scope gets boosted all the way out to f/5.75. It really cleans up the images
in a cheap fast Dob like the Meade 16" Starfinder, and I'm starting to see them
more and more often on the premiun scopes as well. One club member, who owns
an 18" Obsession, says he never takes it out, even for high power viewing. He
demonstrated to me how flat the field becomes with the device in place. With a
9 mm Nagler (263X) in the focuser, Saturn was sharp as it drifted from one edge
to another in the eyepiece. On Jupiter, at certan angles and with certain
eyepieces, the Paracorr will throw up minor ghost images.
There is some confusion over the different models. The photo/visual model is the
less expensive of the two. The visual model is for those who own 31 mm Naglers.
It contains a wider field stop to accomodate this huge eyepiece. If you don't own
(or plan to own) a 31 mm Nagler, you should be just fine with the photo/visual
model. TeleVue also sells the tunable top by itself for about $65 street. I
tried playing with the different positions on the top, but I didn't notice much
difference.
Yes, it's pricey. But as my tastes drift towards larger and faster Dobs these days,
I find this to be an indispensable device.
3) Unistar Mount 3/16/02, 8/16/03
(Alt Az mount, many configurations available, about $600 for version tested)
The Gibraltar/Panoramic and the Teeguls aren't the only Alt-Az games in town.
Larry Patriarca of Universal Astronomics in Worcester Massachusetts is offering
these Unistar mounts at attractive prices. The menu is set up like a cafeteria -
you pick the tripod, mount, head, plate, etc., for your particular needs, he picks
the order for you, and sends it out. Functionally, they resemble the Takahashi
Teeguls - the plate holds your telescope sideways on a single-sided swingarm.
Paracorr (center) with 27 mm Panoptic
The Paracorr does act like a +15% barlow, so figure this into your calculations.
Put another way, your f/4.5 optical train becomes a more reasonable f/5, and your
f/5 scope gets boosted all the way out to f/5.75. It really cleans up the images
in a cheap fast Dob like the Meade 16" Starfinder, and I'm starting to see them
more and more often on the premiun scopes as well. One club member, who owns
an 18" Obsession, says he never takes it out, even for high power viewing. He
demonstrated to me how flat the field becomes with the device in place. With a
9 mm Nagler (263X) in the focuser, Saturn was sharp as it drifted from one edge
to another in the eyepiece. On Jupiter, at certan angles and with certain
eyepieces, the Paracorr will throw up minor ghost images.
There is some confusion over the different models. The photo/visual model is the
less expensive of the two. The visual model is for those who own 31 mm Naglers.
It contains a wider field stop to accomodate this huge eyepiece. If you don't own
(or plan to own) a 31 mm Nagler, you should be just fine with the photo/visual
model. TeleVue also sells the tunable top by itself for about $65 street. I
tried playing with the different positions on the top, but I didn't notice much
difference.
Yes, it's pricey. But as my tastes drift towards larger and faster Dobs these days,
I find this to be an indispensable device.
3) Unistar Mount 3/16/02, 8/16/03
(Alt Az mount, many configurations available, about $600 for version tested)
The Gibraltar/Panoramic and the Teeguls aren't the only Alt-Az games in town.
Larry Patriarca of Universal Astronomics in Worcester Massachusetts is offering
these Unistar mounts at attractive prices. The menu is set up like a cafeteria -
you pick the tripod, mount, head, plate, etc., for your particular needs, he picks
the order for you, and sends it out. Functionally, they resemble the Takahashi
Teeguls - the plate holds your telescope sideways on a single-sided swingarm.
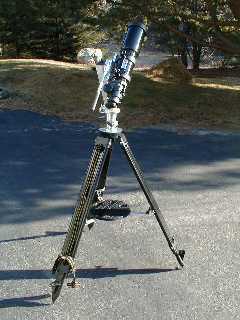 The Stellarvue AT1010 on the Unistar
One thing you learn real fast when talking to Patriarca, and seeing his products,
is that he is really into adjustability, versatility, and sturdiness. He is not
particularly into simplicity or light weight. Aesthetics seem to take a back seat
as well. His Unimount binocular mounts seem to reflect this same philosophy -
build it big and make it adjustable every which way. The Unimounts have so many
features that it's the only bino mount I know of that comes with its own instruction
video. (At the other end of this functionality/aesthetic continuum lies the lovely
and graceful, but simple and small binocular mounts form Bill Blaho.)
I got this sample mount from Universal Astronomics. True to form, Larry sent all
kinds of extra plates and hardware, some of which I never even got around to using.
This one has the heavy duty surveyer's tripod and the Deluxe head. I used the
slotted plate for various tube mounting rings. Users can really go all out on
a Unistar mount if they want to - with the heavyweight head and G11 legs, it'll
support 8"-10" Schimdt-Cassegrains.
I spent about an hour assembling it and had minor confusion when putting together
the tray and spreader bars and had to run inside to log on to UA's web site to see
how it went together (Larry says future versions will have pictures in the instruction
manual.)
The Stellarvue AT1010 on the Unistar
One thing you learn real fast when talking to Patriarca, and seeing his products,
is that he is really into adjustability, versatility, and sturdiness. He is not
particularly into simplicity or light weight. Aesthetics seem to take a back seat
as well. His Unimount binocular mounts seem to reflect this same philosophy -
build it big and make it adjustable every which way. The Unimounts have so many
features that it's the only bino mount I know of that comes with its own instruction
video. (At the other end of this functionality/aesthetic continuum lies the lovely
and graceful, but simple and small binocular mounts form Bill Blaho.)
I got this sample mount from Universal Astronomics. True to form, Larry sent all
kinds of extra plates and hardware, some of which I never even got around to using.
This one has the heavy duty surveyer's tripod and the Deluxe head. I used the
slotted plate for various tube mounting rings. Users can really go all out on
a Unistar mount if they want to - with the heavyweight head and G11 legs, it'll
support 8"-10" Schimdt-Cassegrains.
I spent about an hour assembling it and had minor confusion when putting together
the tray and spreader bars and had to run inside to log on to UA's web site to see
how it went together (Larry says future versions will have pictures in the instruction
manual.)
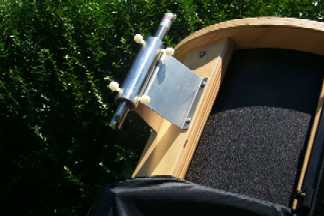
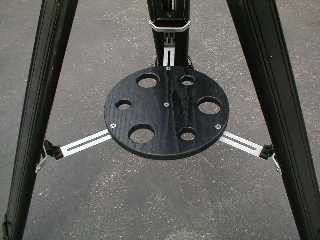 The spreader bar assembly. This is
more complicated than it looks!
Over the course of a couple of weeks, I used the mount with the Stallarvue AT1010 and
102EDT, the AP Star12ED, and 120 mm and 150 mm Synta/Skywatcher refractors. I
found the mount to be stable with these tubes up to about 200X. The 6" Synta was
marginal at slightly lower powers due to its weight and long length. It is at least as
steady as a TeleVue Gibraltar, which I had on hand for comparisons. The motions
are a little smoother as well due to its huge teflon bearing surfaces. The teflon spans
about 4" in altitude, and nearly 3" in azimuth - in contrast the Gibraltar, which has
bearing surfaces of only about an inch. But the Gibraltar is smaller and lighter. Take
your pick.
The spreader bar assembly. This is
more complicated than it looks!
Over the course of a couple of weeks, I used the mount with the Stallarvue AT1010 and
102EDT, the AP Star12ED, and 120 mm and 150 mm Synta/Skywatcher refractors. I
found the mount to be stable with these tubes up to about 200X. The 6" Synta was
marginal at slightly lower powers due to its weight and long length. It is at least as
steady as a TeleVue Gibraltar, which I had on hand for comparisons. The motions
are a little smoother as well due to its huge teflon bearing surfaces. The teflon spans
about 4" in altitude, and nearly 3" in azimuth - in contrast the Gibraltar, which has
bearing surfaces of only about an inch. But the Gibraltar is smaller and lighter. Take
your pick.
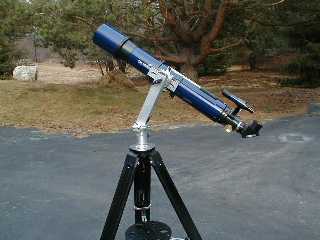 The 120 mm Synta on the Unistar
Some notes to prospective owners:
1) If the mount seems jittery, tighten everything down. The screws, bolts, etc
seem to need time to settle down in the first few days. After this initial period
the hardware seems to stabilize.
2) Try lowering the legs. This wins back some stability.
3) Use the Celestron Vibration Suppression Pads! This really cuts down on the
settling time at high power. Just remember to pick them up afterwards.
The best compliment I can give this Unistar is that I completely forgot about it after
a few nights. It became part of my observing and testing system and never got in the
way. I had several scopes to test during this time, and found myself glad to have it
around for comparisons. If Alt-Az mounts are your cup of tea, check these out.
Update, 8/16/03: The newer Unistar mounts are much nicer looking, as Larry pointed
out to me at this year's Stellafane.
5) Chromacor 4/26/02
(Color and spherical correcting lens assembly, $750 street)
When placed into a conventional achromat, the Chromacor removes most of the false
color, and corrects for spherical aberration as well. Although you can put a Chromacor
into any telescope with a 2" diagonal, it seems to have found a home in the 102 mm
f/10, 120 mm f/8.3 and 150 mm f/8 Chinese refractors made by Synta. These are known
variously as "Celestron," "Bresser," "Konus," "Skywatcher," "Astroview," and others,
depending on where you live (the scopes are hereafter referred to as "Syntas.")
These Syntas vary a lot in quality control. Some, like the Celestron CR150 I had
in, are pretty spectacular, while others have some optical problems. However,
it seems these Syntas have been getting better lately; it's been a while since
I've seen a truly lousy sample. If you put one in a refractor other than a Synta,
be sure you have proper spacing between the eyepiece and the Chromacor. Contact
Aries, or see www.astrobuffet.com for the latest information on variants.
The 120 mm Synta on the Unistar
Some notes to prospective owners:
1) If the mount seems jittery, tighten everything down. The screws, bolts, etc
seem to need time to settle down in the first few days. After this initial period
the hardware seems to stabilize.
2) Try lowering the legs. This wins back some stability.
3) Use the Celestron Vibration Suppression Pads! This really cuts down on the
settling time at high power. Just remember to pick them up afterwards.
The best compliment I can give this Unistar is that I completely forgot about it after
a few nights. It became part of my observing and testing system and never got in the
way. I had several scopes to test during this time, and found myself glad to have it
around for comparisons. If Alt-Az mounts are your cup of tea, check these out.
Update, 8/16/03: The newer Unistar mounts are much nicer looking, as Larry pointed
out to me at this year's Stellafane.
5) Chromacor 4/26/02
(Color and spherical correcting lens assembly, $750 street)
When placed into a conventional achromat, the Chromacor removes most of the false
color, and corrects for spherical aberration as well. Although you can put a Chromacor
into any telescope with a 2" diagonal, it seems to have found a home in the 102 mm
f/10, 120 mm f/8.3 and 150 mm f/8 Chinese refractors made by Synta. These are known
variously as "Celestron," "Bresser," "Konus," "Skywatcher," "Astroview," and others,
depending on where you live (the scopes are hereafter referred to as "Syntas.")
These Syntas vary a lot in quality control. Some, like the Celestron CR150 I had
in, are pretty spectacular, while others have some optical problems. However,
it seems these Syntas have been getting better lately; it's been a while since
I've seen a truly lousy sample. If you put one in a refractor other than a Synta,
be sure you have proper spacing between the eyepiece and the Chromacor. Contact
Aries, or see www.astrobuffet.com for the latest information on variants.
 Chromacor, threaded into diagonal
There are several models of Chromacors. All have the same color correcting ability,
but have differing levels of spherical correction built-in. According to Aries, if
spherical error is in the 1/4 wave to 1/6 wave area, then spherical correction
becomes as important as color correction. Assume, for example, that your refractor's
objective has 1/5 wave of undercorrection, a common enough occurance. Placing an
O1 Chromacor in your optical train, which overcorrects by 1/7 wave, should result in
1/5 + (-1/7) = 1/18 wave of spherical aberration! Thus, with a Chromacor properly
matched to your telescope, you should see a dramamtic increase in color correction
and image sharpness.
There are several models:
1) "U1" (Built-in Undercorrection) models for overcorrected scopes
2) "O1" (Built-in Overcorrection) for undercorrected scopes
3) "N" (Null) for scopes with neutral (or near-neutral) figures.
Aries strongly recommends the use of the 2" Intes diagonal, citing its excellent
optical and mechanical properties. I can think of at least one more reason
to use it - the Chromacor requires a certain working distance between itself
and the eyepiece, and not all diagonals have the same length of travel within
them. Your spacing may be more accurate with the Intes unit. Aries also
recommends the use of the stock Chinese 2"-1.25" adapter for similar reasons.
[During the review period Valery at Aries brought this point up several times -
he very strongly advises the use of the Intes diagonal, and the stock Chinese
adapter, over all other models.]
If you don't feel like figuring all this out, your dealer will match a Chromacor to
your tube. Some dealers will sell you a matched Synta/Chromacor set. After
trying to match a few Syntas and Chromacors together myself, with varying degrees
of success, I'd recommend this. Also, for those who are still not sure whether
they want the device for sure or not, dealer John Hopper offers a lease program
where users can try before they buy.
Screw the device into your 2" diagonal, put in an eyepiece, and you'll see that
virtually all of the false color in your objective has been wiped clean. The
correction is much better than that in the TeleVue Ranger/Pronto, or the Vixen
102ED f/6.5, as a reference. The effect can be startling.
The device is set to work at a certain distance from your eyepiece. Most eyepieces
come pretty close to that figure (228 mm from the glass to the telescope focus point)
but there is some variation among parfocality of certain models. Dealer John
Hopper, who I visited, uses Vixen Lanthanums. The Vixens, like most other Japanese
eyepieces, take a lot of in-focus travel. The TeleVues, on the other hand, take
a lot of out-focus travel. To accomodate the differences between eyepieces, your
dealer can supply you with spacer rings that fit between the Chromacor and the
diagonal. These little 3 mm - 4 mm spacers allow you to fine tune your system.
Although he has no hard data to back it up yet, Hopper usually recommends that
users stick with simpler eyepieces - Plossls and Orthoscopics, for example. I can
at least partially verify this. For some reason, many of the TeleVue Radians
did not perform at the level of their simpler counterparts.
Chromacor, threaded into diagonal
There are several models of Chromacors. All have the same color correcting ability,
but have differing levels of spherical correction built-in. According to Aries, if
spherical error is in the 1/4 wave to 1/6 wave area, then spherical correction
becomes as important as color correction. Assume, for example, that your refractor's
objective has 1/5 wave of undercorrection, a common enough occurance. Placing an
O1 Chromacor in your optical train, which overcorrects by 1/7 wave, should result in
1/5 + (-1/7) = 1/18 wave of spherical aberration! Thus, with a Chromacor properly
matched to your telescope, you should see a dramamtic increase in color correction
and image sharpness.
There are several models:
1) "U1" (Built-in Undercorrection) models for overcorrected scopes
2) "O1" (Built-in Overcorrection) for undercorrected scopes
3) "N" (Null) for scopes with neutral (or near-neutral) figures.
Aries strongly recommends the use of the 2" Intes diagonal, citing its excellent
optical and mechanical properties. I can think of at least one more reason
to use it - the Chromacor requires a certain working distance between itself
and the eyepiece, and not all diagonals have the same length of travel within
them. Your spacing may be more accurate with the Intes unit. Aries also
recommends the use of the stock Chinese 2"-1.25" adapter for similar reasons.
[During the review period Valery at Aries brought this point up several times -
he very strongly advises the use of the Intes diagonal, and the stock Chinese
adapter, over all other models.]
If you don't feel like figuring all this out, your dealer will match a Chromacor to
your tube. Some dealers will sell you a matched Synta/Chromacor set. After
trying to match a few Syntas and Chromacors together myself, with varying degrees
of success, I'd recommend this. Also, for those who are still not sure whether
they want the device for sure or not, dealer John Hopper offers a lease program
where users can try before they buy.
Screw the device into your 2" diagonal, put in an eyepiece, and you'll see that
virtually all of the false color in your objective has been wiped clean. The
correction is much better than that in the TeleVue Ranger/Pronto, or the Vixen
102ED f/6.5, as a reference. The effect can be startling.
The device is set to work at a certain distance from your eyepiece. Most eyepieces
come pretty close to that figure (228 mm from the glass to the telescope focus point)
but there is some variation among parfocality of certain models. Dealer John
Hopper, who I visited, uses Vixen Lanthanums. The Vixens, like most other Japanese
eyepieces, take a lot of in-focus travel. The TeleVues, on the other hand, take
a lot of out-focus travel. To accomodate the differences between eyepieces, your
dealer can supply you with spacer rings that fit between the Chromacor and the
diagonal. These little 3 mm - 4 mm spacers allow you to fine tune your system.
Although he has no hard data to back it up yet, Hopper usually recommends that
users stick with simpler eyepieces - Plossls and Orthoscopics, for example. I can
at least partially verify this. For some reason, many of the TeleVue Radians
did not perform at the level of their simpler counterparts.
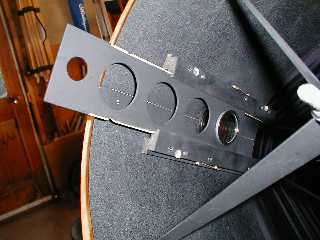
 John Hopper's test rig: 4 X Synta 150 (L),
1 Synta 120 (R)
I spent some time looking at the moon, Jupiter, Saturn, Venus, and Mercury in
Hopper's tuned Synta/Chromacor rig (the targets were conveniently aligned in
April of 2002.) We had a Vixen VX120 neo-achromat (a 4-element Petzval design)
nearby for comparison. Much as I like the VX120, the Synta/Chromacor combo was
beating it on color correction and low-level detail on all of the objects.
Based on the large number of emails I get from Chromacor owners, most of you
will find this to be a plug-n-play device. But on occasion, a few of you may
find the images are not quite sharp at high power. This happened to me the first
time out, and not knowing how to fix the problem, I almost gave up on the device.
There are a few things you can do to get maximum performance out of the Chromacor.
In approximate order, try these:
1) Make sure the objective lens is properly squared-on.
2) Experiment with proper spacing. Lift the eyepiece off the diagonal and clamp
it. Refocus. Repeat. At some point you will find the images sharpen up. Insert
spacers to make up the difference.
3) Make sure the focuser is squared-on.
4) Try different eyepieces. Try simpler eyepieces.
5) Get a new tube - they're cheap (last resort.)
Even if your Chromacor seems to be functioning well, one (or more) of the above should
help things even more. There seems to be a small cottage industry of people dedicated
to wringing the last ounce of performance out of these devices; check them out online.
Also, I'm told an instruction/suggestion sheet is in the works.
I haven't tried binoviewing, photography, or CCD through the device yet.
Recommeneded for achromat owners looking for a taste of APO performance at a modest
cost.
5) Filter Slide by Astrocrumb 4/26/02
(2" Filter slide for larger Dobsonians, $79 net)
(Available at www.astrocrumb.com)
I don't know about you, but as the evening wears on, I am less inclined to use my
filters, even when I know I should be using them. The thought of removing the
eyepiece, screwing (and then unsrewing) the filter becomes a deterrent when I'm
tired.
John Hopper's test rig: 4 X Synta 150 (L),
1 Synta 120 (R)
I spent some time looking at the moon, Jupiter, Saturn, Venus, and Mercury in
Hopper's tuned Synta/Chromacor rig (the targets were conveniently aligned in
April of 2002.) We had a Vixen VX120 neo-achromat (a 4-element Petzval design)
nearby for comparison. Much as I like the VX120, the Synta/Chromacor combo was
beating it on color correction and low-level detail on all of the objects.
Based on the large number of emails I get from Chromacor owners, most of you
will find this to be a plug-n-play device. But on occasion, a few of you may
find the images are not quite sharp at high power. This happened to me the first
time out, and not knowing how to fix the problem, I almost gave up on the device.
There are a few things you can do to get maximum performance out of the Chromacor.
In approximate order, try these:
1) Make sure the objective lens is properly squared-on.
2) Experiment with proper spacing. Lift the eyepiece off the diagonal and clamp
it. Refocus. Repeat. At some point you will find the images sharpen up. Insert
spacers to make up the difference.
3) Make sure the focuser is squared-on.
4) Try different eyepieces. Try simpler eyepieces.
5) Get a new tube - they're cheap (last resort.)
Even if your Chromacor seems to be functioning well, one (or more) of the above should
help things even more. There seems to be a small cottage industry of people dedicated
to wringing the last ounce of performance out of these devices; check them out online.
Also, I'm told an instruction/suggestion sheet is in the works.
I haven't tried binoviewing, photography, or CCD through the device yet.
Recommeneded for achromat owners looking for a taste of APO performance at a modest
cost.
5) Filter Slide by Astrocrumb 4/26/02
(2" Filter slide for larger Dobsonians, $79 net)
(Available at www.astrocrumb.com)
I don't know about you, but as the evening wears on, I am less inclined to use my
filters, even when I know I should be using them. The thought of removing the
eyepiece, screwing (and then unsrewing) the filter becomes a deterrent when I'm
tired.
 These filter slides are not a new idea, but this is the first time in years (that I'm
aware of) that someone has made a concerted effort to promote them. Local
club member Roger Greenwood makes these and sells them over the internet for
$45. Although they are nominally made for Obsessions, they can be made to fit
any upper truss assembly. By now he knows the dimensions of most UTAs, but
if you have an unusual model (or a homemade one) just tell him the diameter of the
UTA and he'll make adjustments. To avoid cutoff of the light cone, the slides are
built to accept 2" filters only. The filter slide comes in a kit with illustrated
instructions, a razor blade, and even a white glove for handling your filters.
Once installed, all you do is pull on the slide with your finger and the detented
stop clicks your filters into place. You can set up your slide set to check out
any object with, say, a broadband, narrowband, OIII, etc filter. Some combinations
will work well, some won't. The point is that you'll use the filters more, and
learn something (I'm surprised, for example, how well an OIII filter consistently
works with planetary nebulas.)
There are a few minor drawbacks. Because the filters are now in your Dob, you
may not have easy access to them if you have other scopes. Also, leaving them
out in the open makes them susceptible to dust and dew (Roger removes his slide
set for transport.) There may be minor fit problems on smaller Dobs that have
narrower focusing boards. Contact Roger for advice.
A nice accessory to own.
Update, 4/04: Roger reports that newer units are threaded, which means your filters
need no longer be "tied down" to the filter slide. You can remove them for storage,
or for use in other devices. According to Roger, the unthreaded versions were
discontinued some time ago.
Update, 8/04: The new price for the threaded versions is $79.
6) Focus Knobs from www.focusknobs.com 6/1/02
(Replacement knobs for refractors, newtonians and SCTs)
(1.5", 2", aluminum, brass, etc, $19.95-$26.95 a pair + shipping)
Here's a nice way to spruce up your inexpensive telescope. Made of aluminum
or brass, and measuring 1.5" - 2", these nice knobs are studier, nicer, and
provide a bigger gripping surface than the original equipment knobs on your
current scope. The knobs come with integral set screws, and an allen key.
These filter slides are not a new idea, but this is the first time in years (that I'm
aware of) that someone has made a concerted effort to promote them. Local
club member Roger Greenwood makes these and sells them over the internet for
$45. Although they are nominally made for Obsessions, they can be made to fit
any upper truss assembly. By now he knows the dimensions of most UTAs, but
if you have an unusual model (or a homemade one) just tell him the diameter of the
UTA and he'll make adjustments. To avoid cutoff of the light cone, the slides are
built to accept 2" filters only. The filter slide comes in a kit with illustrated
instructions, a razor blade, and even a white glove for handling your filters.
Once installed, all you do is pull on the slide with your finger and the detented
stop clicks your filters into place. You can set up your slide set to check out
any object with, say, a broadband, narrowband, OIII, etc filter. Some combinations
will work well, some won't. The point is that you'll use the filters more, and
learn something (I'm surprised, for example, how well an OIII filter consistently
works with planetary nebulas.)
There are a few minor drawbacks. Because the filters are now in your Dob, you
may not have easy access to them if you have other scopes. Also, leaving them
out in the open makes them susceptible to dust and dew (Roger removes his slide
set for transport.) There may be minor fit problems on smaller Dobs that have
narrower focusing boards. Contact Roger for advice.
A nice accessory to own.
Update, 4/04: Roger reports that newer units are threaded, which means your filters
need no longer be "tied down" to the filter slide. You can remove them for storage,
or for use in other devices. According to Roger, the unthreaded versions were
discontinued some time ago.
Update, 8/04: The new price for the threaded versions is $79.
6) Focus Knobs from www.focusknobs.com 6/1/02
(Replacement knobs for refractors, newtonians and SCTs)
(1.5", 2", aluminum, brass, etc, $19.95-$26.95 a pair + shipping)
Here's a nice way to spruce up your inexpensive telescope. Made of aluminum
or brass, and measuring 1.5" - 2", these nice knobs are studier, nicer, and
provide a bigger gripping surface than the original equipment knobs on your
current scope. The knobs come with integral set screws, and an allen key.
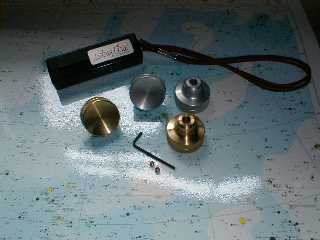 Brass and aluminum knobs
Owners of Synta (Bresser, Skywatcher, Astroview, Konus, etc) refractors report
that the brass knobs - which are heavier than the aluminum ones - also present
a mild benefit by weighting down the back end of the tube (Syntas are usually
front-heavy, especially as you get to the larger models.)
Owner/maker Bryan Varney also makes knobs for SCTs or Newtonians (like the
Orion XT series), and can supply knobs that take .33" and .25" shaft diameters
(the latter will fit AP refractors, among other models.) Call or email to ask
about your particular needs. They're nice-looking, and they're cheap. Think
about getting a pair!
End Page 8
Brass and aluminum knobs
Owners of Synta (Bresser, Skywatcher, Astroview, Konus, etc) refractors report
that the brass knobs - which are heavier than the aluminum ones - also present
a mild benefit by weighting down the back end of the tube (Syntas are usually
front-heavy, especially as you get to the larger models.)
Owner/maker Bryan Varney also makes knobs for SCTs or Newtonians (like the
Orion XT series), and can supply knobs that take .33" and .25" shaft diameters
(the latter will fit AP refractors, among other models.) Call or email to ask
about your particular needs. They're nice-looking, and they're cheap. Think
about getting a pair!
End Page 8
Back to Home Page